Redis is an open-source application, and it helps to store in-memory data structures, used as databases, for object caching, and more. Here in this article, I am going to explain how you can configure Redis Object Cache for WordPress to get maximum performance and speed.
Object caching is great for dynamic websites such as websites based on WordPress and other self-hosted CMS. On these platforms, content is frequently added and updated, in comparison to static.
When visitors return to your site, it loads much faster than before, loads faster even if you make changes or update content, thanks to the object cache.
Before configuring that you must know, what is Object Caching and how it works. And we are seeing how it is going to speed up your WordPress website. So, let’s start.
What is Object Caching?
Object caching is a type of caching, and it performs server-side. And this means the caching is handled at the server level and isn’t controlled by the front-end user.
Object cache stores data structures and database queries when first time loaded. When the visitor visits again (or requests the query again), the object cache serves data from the cache, without quired from the database. So, it reduces the high load on the database and performs better on the user end.

WP Rocket Black Friday Sale!!!
Is your WordPress website having speed issues, with bad cache management? Then you can get WP Rocket with 30% off price on this Black Friday sale.
Configuring Redis as Object Cache
It is necessary to have installed Redis on your server. If you are using shared hosting with cPanel, then in this tutorial you will find out how you can check, if Redis is installed on not. In case you are using dedicated, or cloud VPS hosting check out the article: how to install Redis on a Linux server.
Configure Redis for WordPress on VPS
After installing Redis on Linux VPS (Ubuntu or Debian), you must follow these steps to successfully configure the object cache on WordPress.
Step – 1. Edit redis.conf the file using the following command:
sudo nano /etc/redis/redis.confStep – 2. Add these lines at the end of the redis.conf file:
maxmemory 256mb
maxmemory-policy allkeys-lru
Save the redis.conf file using CTRL+X and type Y and hit enter key on the keyboard.
Step – 3. Redis Cache Backend PHP Script for WordPress
This is optional, and instead of the script, you can use the functional “Redis Object Cache” or “LiteSpeed Cache” WordPress plugin.
Perhaps, it is a single PHP file (open source) developed by Eric Mann, you can download it from Digital Ocean’s asset server, using the following command:
wget https://assets.digitalocean.com/articles/wordpress_redis/object-cache.phpStep – 4. Move the PHP file to /wp-content directory of WordPress
sudo mv object-cache.php /var/www/html/wp-content/Depending on your server configuration or WordPress installation, your location may be different from the example, so use commands as your specific directories.
Step – 5. Edit wp-config.php for configuring the Redis object cache
sudo nano /var/www/html/wp-config.phpStep – 6. Add this line of code end of the Authentication Unique Keys and Salts Section:
define(‘WP_CACHE_KEY_SALT’, ‘example.com’);Here on example.com, you must palace your domain name. And you should make sure that you have also this line define(‘WP_CACHE’, true); on the wp-config.php file. If not, you can add this line with the salt key.
Now, to save the modification press CTRL+X and type Y, and hit enter on the keyboard.
Step – 7. Restart Redis and Apache
Restart Redis Server:
sudo service redis-server restartRestart Apache Web Server:
sudo service apache2 restartConfigure Redis for WordPress on cPanel
Configuring the Redis object cache on cPanel is the easiest method. If you are using any VPS or Dedicated hosting with cPanel, most shared hosting comes with cPanel for giving better user experiences.
Follow below these steps and you will be successfully configuring the Redis cache on WordPress.
Step – 1. Login cPanel and Find “Select PHP Version”
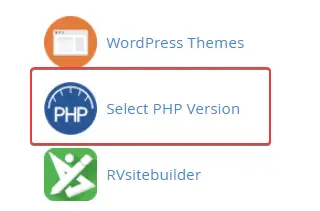
When you logged in cPanel dashboard (Hosting Dashboard), scroll down or search “Select PHP Version” and click on it, and it will open the PHP version and modules selection page.
Step – 2. Check Mark on Redis
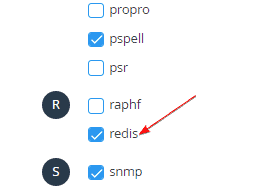
After opening the PHP selection page, scroll down and find Redis, as shown in the image above. I will be unchecked, for enabling the object caching feature you must checkmark the module and then need to install a plugin.
In case you don’t find this module on cPanel, you must contact to host provider. Every hosting service provider varies with features, in this tutorial we have used ChemiCloud Turbo hosting powered by Linode Cloud, they provide every required feature, faster performance, and 24*7 support at an affordable price.
Check out the ChemiCloud long-term usage review if you want to switch your current hosting services.
Step – 3. Install Object Caching Plugin (Final Step)
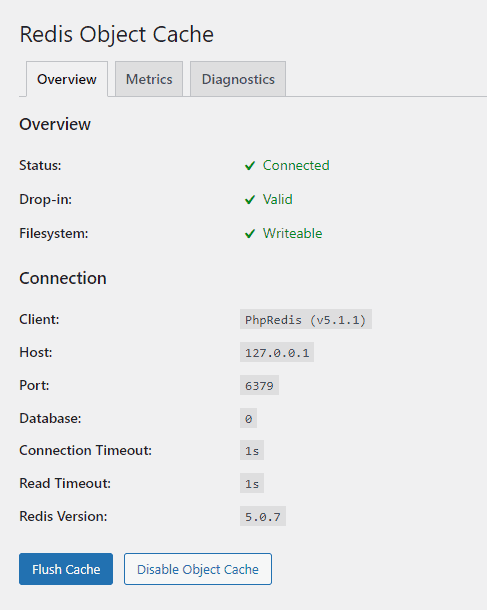
There are multiple plugins, and you can use one of them. The most popular plugin is “Redis Object Cache” for performance needs to be installed and activated, no need for further configuration.
The open-source caching plugin LiteSpeed plugin is also very popular, if your hosting is based on a LiteSpeed web server then it’s recommended to use this plugin. It will work perfectly for page caching and object caching.
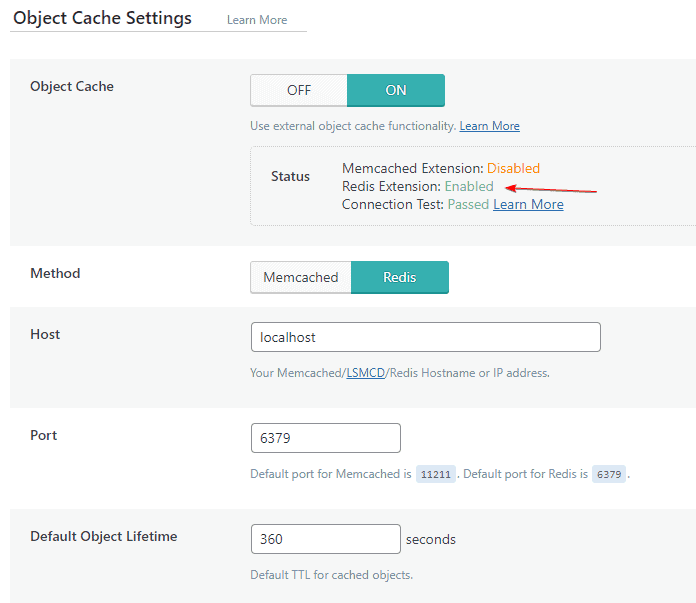
Check out the in-depth tutorial to configure the LiteSpeed cache with WordPress to improve Core Web Vitals.
Why Object Caching is helpful for WordPress?
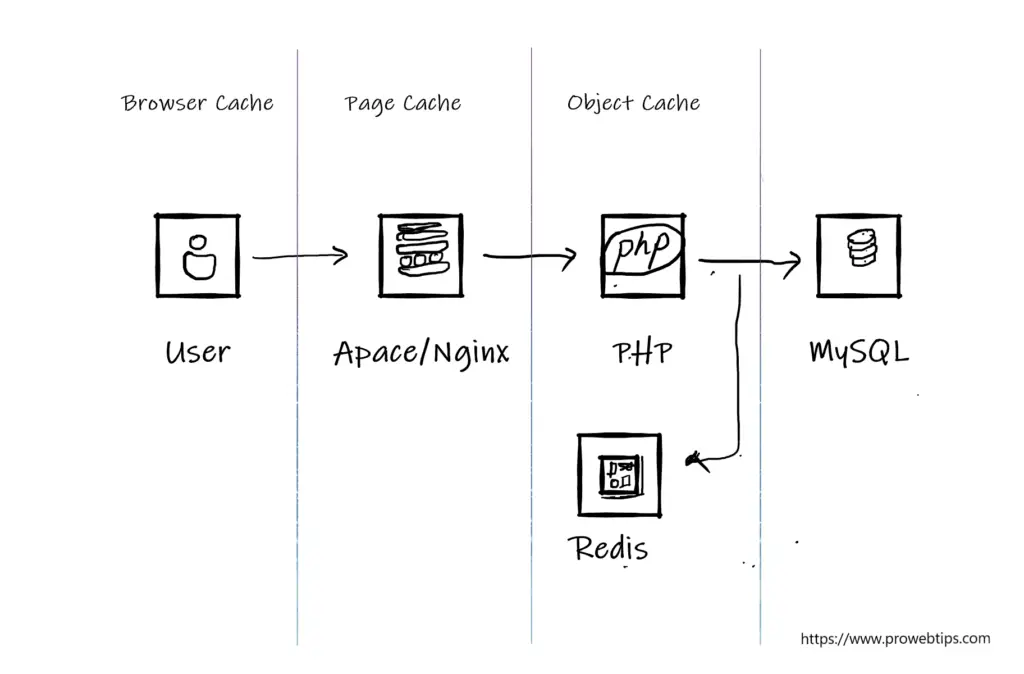
Having browser and page cache enabled on WordPress is extremely helpful, it speeds up your site speed faster than ever, but if you also enable object caching then it will help more.
There are different techniques of object caching on WordPress, like Memcached and Redis, even WordPress has its built-in object caching features, but you must add a line of code on the wp-config.php file.
Redis and Memcached are persistent object caches and they improve performance with browser and page cache. These persistent object caching features hold caches for a longer time in comparison to the built-in WordPress object cache.
If you have an AMP website powered by WordPress, then for better content delivery you must enable persistent caching like Redis or Memcached.
FAQs about Redis Object Caching
Why is AMP showing “Persistent object caching is not enabled”?
AMP is an open-source HTML framework, when you use the AMP plugin with a WordPress website, it converts the original base code (HTML, CSS, and JavaScript) into minified version, and all the data is stored separately.
So, serving these codes it takes a load on the server, especially the images and stylesheets. If you install persistent object caching on the server it improves the performance.
How to monitor Redis object caching?
Monitoring Redis object cache on WordPress could be done using plugins like WP Query Monitor, or Redis Object Cache. If you have SSH access to the server, you can monitor it by executing the following command sudo redis-cli monitor.
How to enable object caching on LiteSpeed?
You must make sure that your server has installed Redis or Memcached installed, if not then you can use the following methods mentioned above.
For beginners, I suggest you contact the customer support of the hosting provider. Afterward, simply open LiteSpeed caching plugin settings and enable the object cache and save the settings.
Is object cache helpful for Woocommerce?
Yes, object caching is helpful for the Woocommerce website. Shared hosting is mostly ideal for just blogging and portfolio-type websites. If you wish to launch an eCommerce website on WordPress, then Woocommerce is required Woocommerce puts heavy loads on the database, so the best way to reduce, this is must enable object caching.
Which are the best plugins for object cache?
Specifically, for Redis, you can use the Redis Object Cache plugin and for Memcached or Redis you can use LiteSpeed Cache or W3 Total cache plugin.
Can we use the Redis object cache with WP Rocket?
Yes, WP Rocket is one of the best caching plugins for WordPress websites. This plugin is required minimum configuration and gives the topmost results in performance. You can refer official blog post on WP Rocket related to object caching with the WP Rocket plugin to speed up the websites.
Conclusion
Object caching is an additional step to improve server/hosting performance. WordPress is a pre-packaged application (Containing, PHP, CSS, HTML, JavaScript, etc), and afterward, you also add your content to it. So, to serve these you must need capable web hosting or server.
But sometimes you must tweak the settings of the server so your visitors get the best of it, for that you must use object caching features alongside browser cache and page cache.
WP Rocket is our pickup for optimizing WordPress performance, this plugin will improve your website load time by up to 50% more than usual.