If you are looking for a way to backup a WordPress site for free, there are various methods and plugins available to do it. Most users backup their site in the same location where the WordPress site is hosted.
In that case, if the site got hacked or your hosting account and the hackers wiped the completed data, then there is no way to restore your WordPress website’s data.
And some cases, WordPress users store their backup data locally on their computer, it is a viable choice but, still, there are chances to get file corruption.
So, there are any alternative options, where you can store your WordPress backup data?
Yes, Storj Decentralized Cloud Storage is an object storage platform, where you can privately store the WordPress backup data with encryption.
Here in this tutorial, we are going to learn how you can schedule your WordPress site backup and store the data to Storj DCS.
Prerequisites
To get started, two necessary things are required as follows:
- UpdraftPlus Backup Plugin (Free)
- Storj DCS Bucket (Free)
Create Storj DCS Bucket & Generate S3 Credentials
To create a bucket on Storj DCS, you must register first on their platform. Storj DCS provides 150 GB of free storage and there you can create buckets and store or upload your data.
Step – 1. Create Storj DCS Account
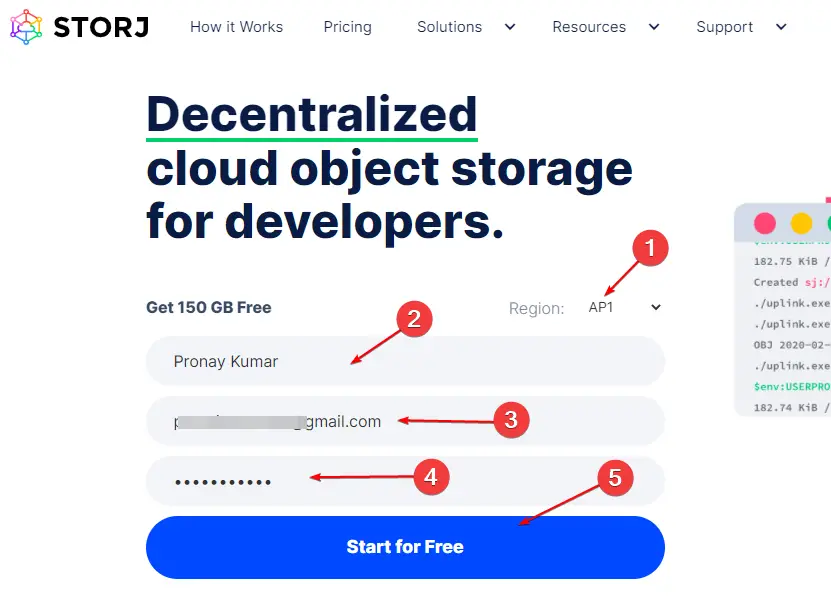
To create an account visit Storj DCS’s official website. And as shown in the image above, first select the region of storage and then fill up your account credentials. Then click on the “Start for Free” button, then check your email inbox and verify the email.
Must Read: - How to Host Multiple WordPress Sites on a Single Server?
Step – 2. Create a Bucket
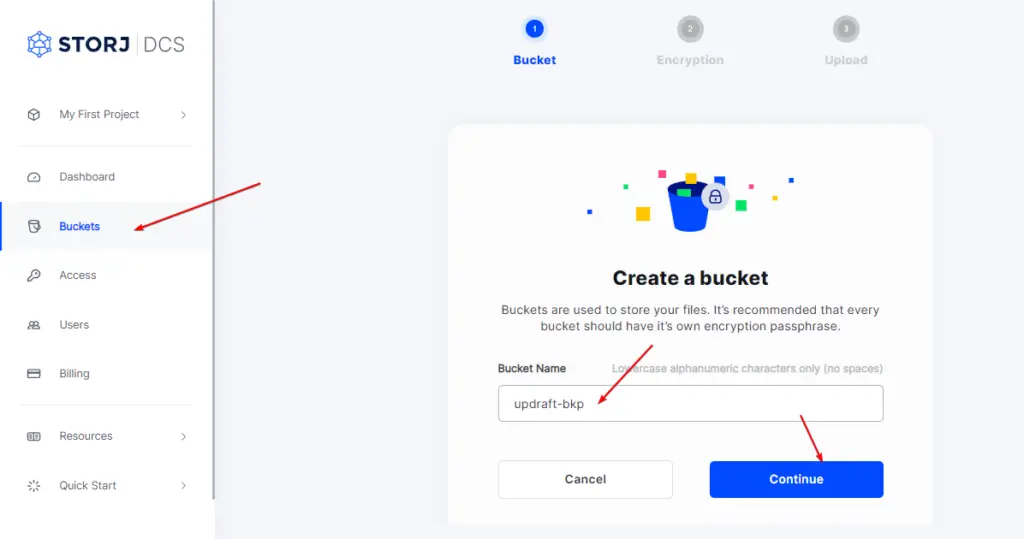
After verifying the email, Sotrj will take you to the bucket section to create a new bucket. As you can see from the image above, first give the bucket name and click continue to set a passphrase.
Step – 3. Set Encryption
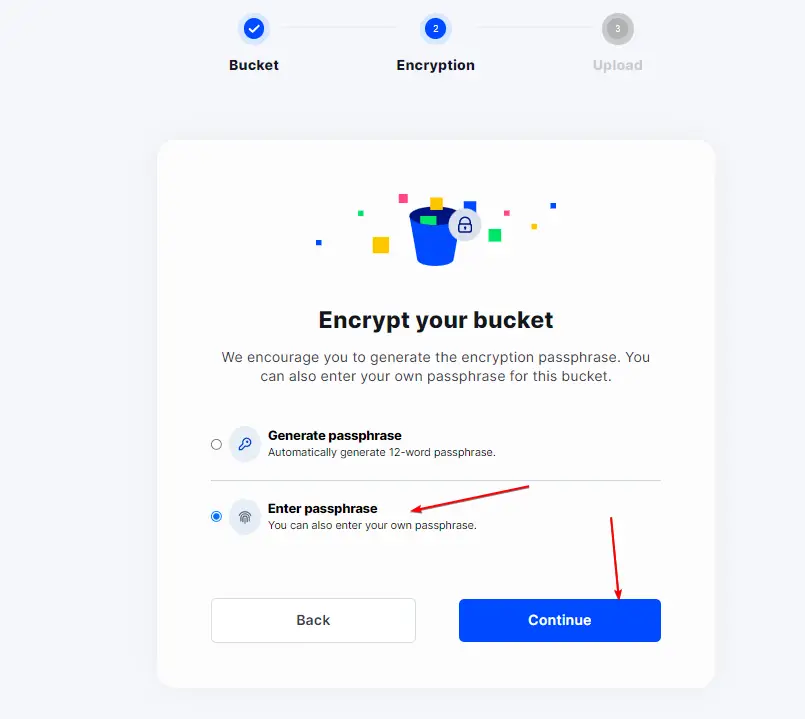
To set encryption or passphrase, you will get two options. First, generate a passphrase (auto) and enter the passphrase (manual). You can choose either of them, but make sure you have stored the passphrase in a safe place. Because to access the bucket the passphrase will be required. After entering the passphrase, hit continue.
Step – 4. Create Access Grant
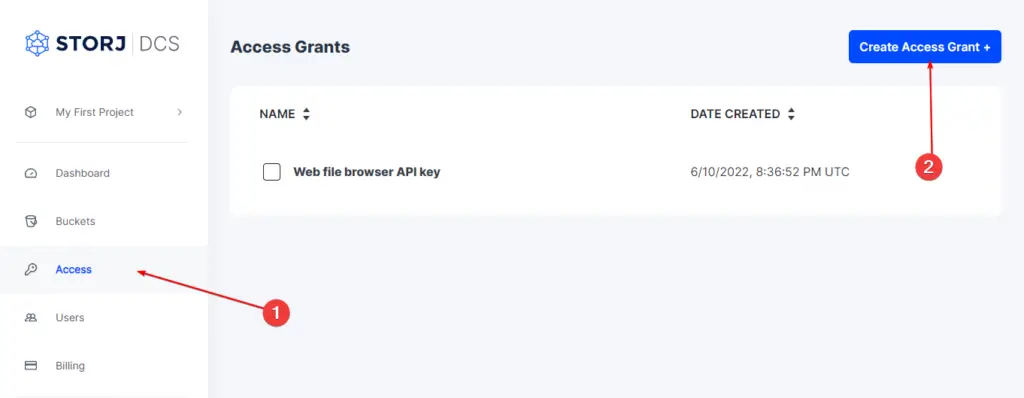
To integrate Storj DCS with another app, you will need secret keys, and it will help to handle upload, download, or deletion behavior in the app.
Storj DCS is also S3 compatible, which is make it much easier to integrate with other apps. So, go to the access section and click on the “Create Access Grant” button.
Step – 5. Give Access Grant Name
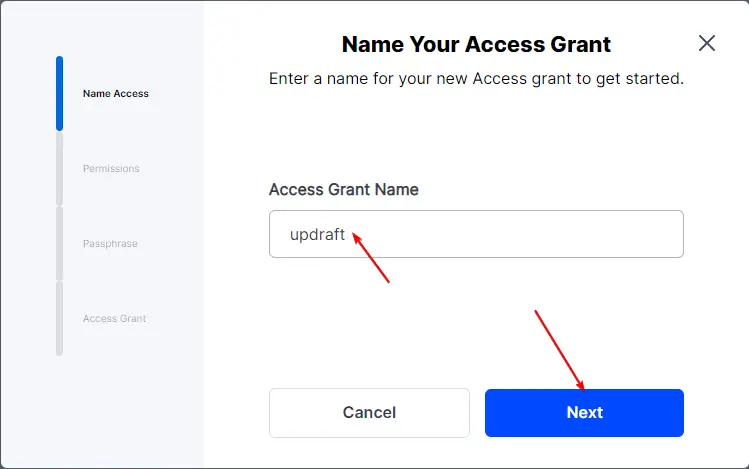
To create a new access grant, first, give the access name. It will help to identify and remove unnecessary access.
Step – 6. Give Access Permission
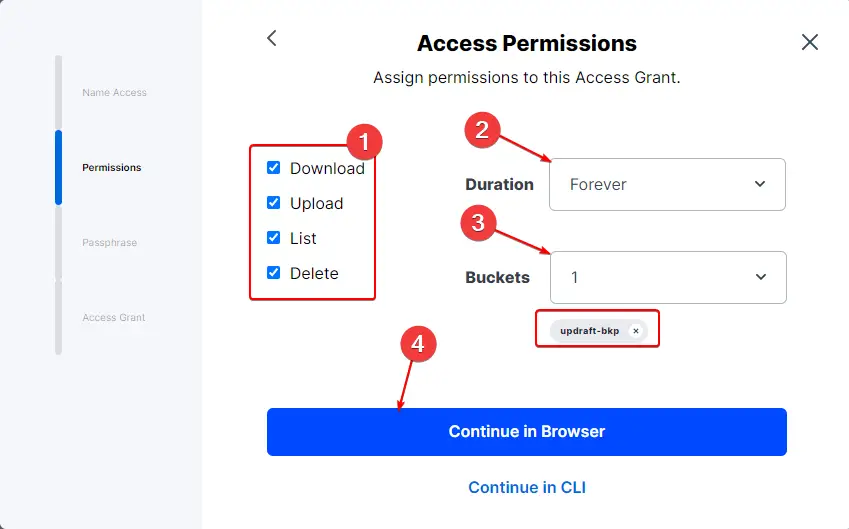
Now in this step, need to set the access permission. So, we are going to use Storj DCS to backup a WordPress website. So, select all permission and select the bucket, where the backup data will be stored. After that click on the “Continue in Browser” button.
Step – 7. Set Encryption Passphrase (Password)
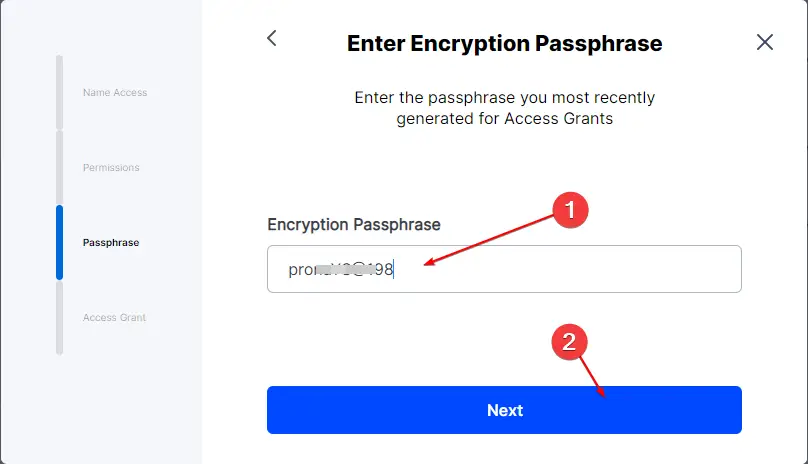
Now set the passphrase for the access grant. And then click on next to generate the S3 compatible secret keys.
Step – 8. Generate S3 Gateway Credentials
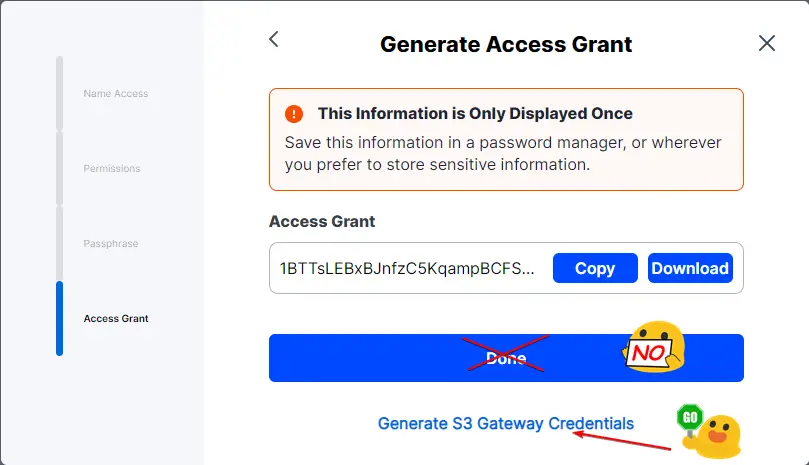
After setting the passphrase, the Storj DCS access grant key will appear, but we need S3 compatible keys. For that, as shown in the image click on Generate S3 Gateway Credentials.
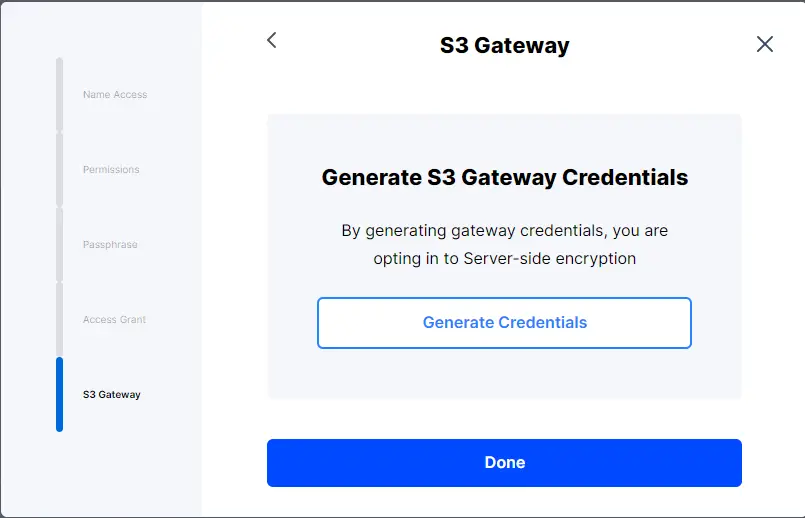
Now to generate S3 Gateway Credentials, click on the button as shown in the image. Then the secret keys and the endpoint URL will appear.
Step – 9. Keep Safe the S3 Gateway Credentials
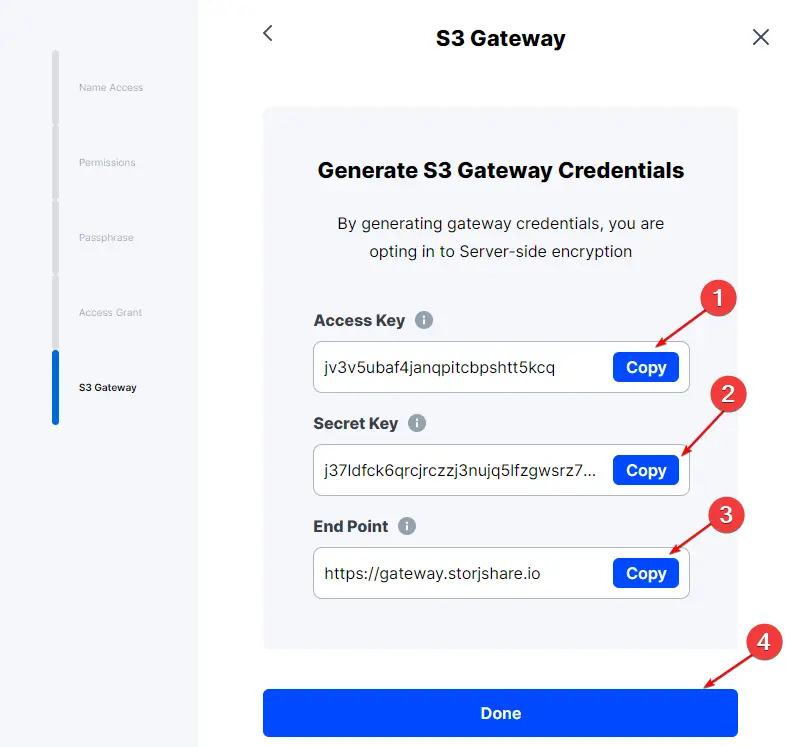
When the credentials appear, copy them, or make a text file and store the credentials safely. When we will set up the UpdraftPlus WordPress Backup plugin, these keys will be required.

HostGator Shared Hosting at $2.75/ per month
Cloud hosting could be a hurdle for you because you have to manage everything by yourself to maintain the cost. But choosing the best hosting like HostGator, you can forget this managing part, and the best thing is that it is affordable.
Configure UpdraftPlus Backup with Storj DCS
UpdraftPlus backup plugin has various remote location options to store the backup data. You can choose Google Drive or Microsoft OneDrive. But in this tutorial, we are going to use Storj DCS which is an S3 Compatible object storage platform and gives 150 GB of free storage.
Step – 1. Schedule Auto-backup

First, we need to set up an auto-backup schedule. For that visit the UpdraftPlus plugin’s setting. Then specify the backup cycle. The auto-backup schedule is optional because you can also take backup manually.
Step – 2. Choose Remote Storage to Store Backup Files
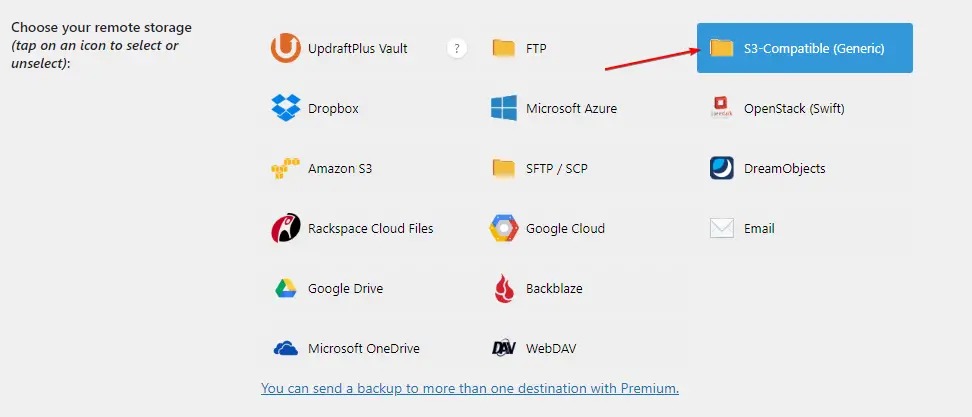
The next step, choose the remote storage. Here we need to select S3 Compatible (Generic) option as you can see in the image above.
Step – 3. Configure UpdraftPlus with Storj DCS S3 Compatible
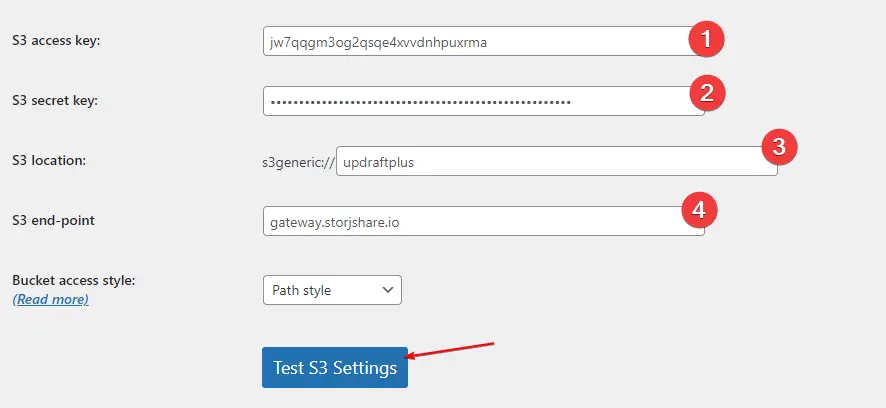
Afterward, we must specify the Storj DCS secret key, access key, bucket name, and the endpoint URL as you can see in the image above. Make sure that you have removed the https:// from the endpoint URL, otherwise, the Storj DCS connection will not work.
Step – 4. Test UpdraftPlus S3 Compatible Configuration
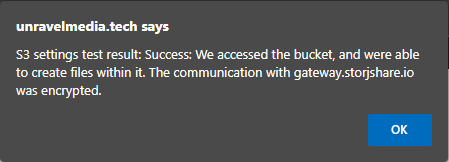
In the final step, when you click on the “Test S3 Setting” button, a success notification will pop, as shown in the image above. And that means the UpdraftPlus and Storj DCS configuration is successful. Now, hit the save changes button to save the configuration.
Take a Manual WordPress Backup using UpdraftPlus
In the UpdraftPlus setting, we have scheduled automatic backup to the Storj DCS. But, to confirm our configuration with Storj DCS we should take a manual backup.
Step – 1. Take Backup Now

To take a complete WordPress site backup, open the UpdraftPlus dashboard and click on the Backup Now button.
Step – 2. Check the Backup Options
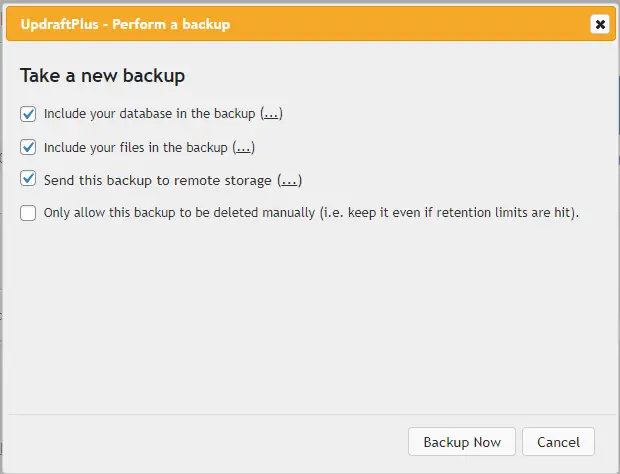
When you click on the Backup Now button, UpdraftPlus prompt you to choose certain options, like backup including database, plugins, etc.
Now, hit the “Backup Now” button to take backup, and it will take a while to complete the process.
Step – 3. Verify the Backup Files
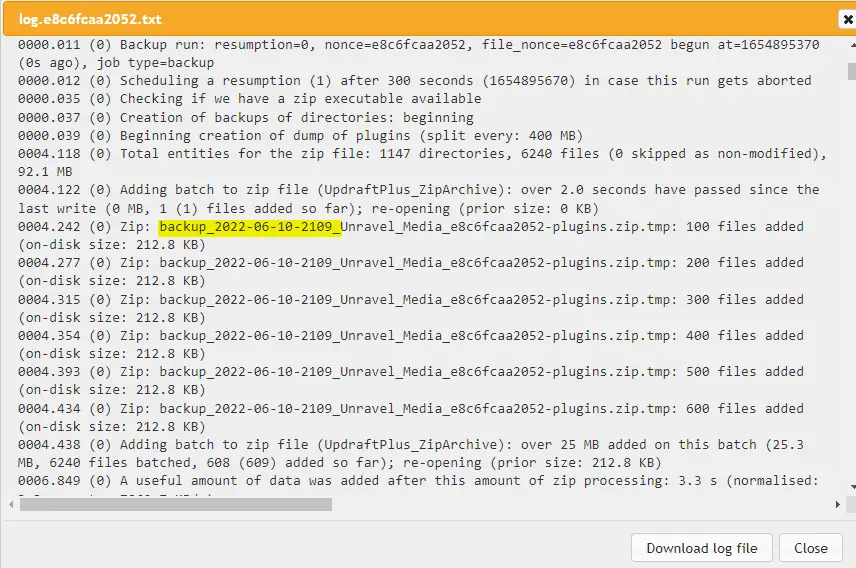
After completing the backup process open the backup logs, where you will find the backup file’s name and other information. To cross verify, whether the backup data is stored in Storj DCS or not, match the name of backup file data with the stored data file name.
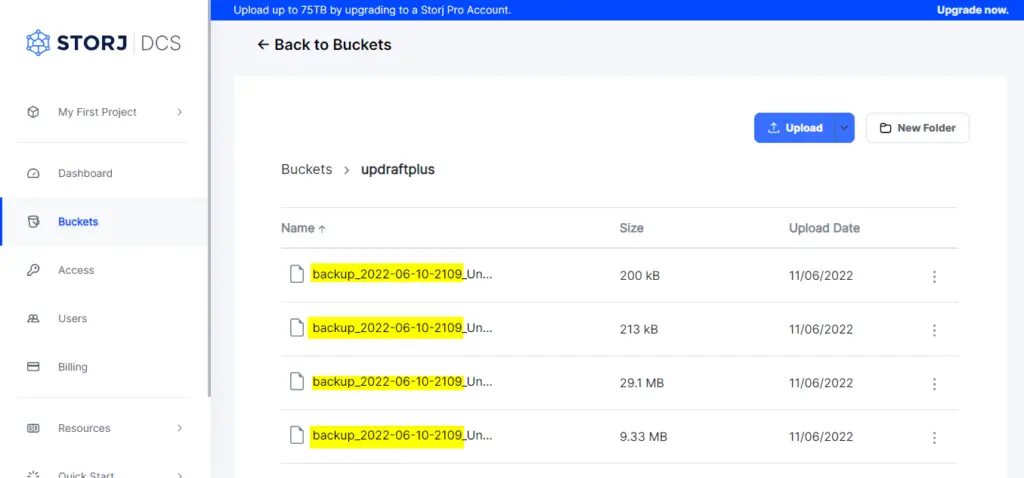
As you can see from the image above, the file name has been matched, which means the configuration and the backup process are perfectly working.
Conclusion
If you are using WordPress and looking for a way to take your WordPress site backup, this tutorial will help you.
Ultimately, you will understand the entire process of Storj DCS and WordPress backup using the UpdraftPlus free backup plugin. We hope that you can benefit from this tutorial and be able to store your WordPress backups in Storj DCS.