LEMP stack is a group of software packages that include Linux, Nginx, MySQL/MariaDB, and PHP.
These three software packages can be used in various web application projects like WordPress, Drupal, or Joomla CMS-based websites. Even you can use it in other popular applications like phpBuddy, Flarum, etc.
It is similar to the LAMP stack where we use Apache instead of the Nginx reverse proxy server. The LAMP stack stands for Linux, Apache, MySQL/MariaDB, and PHP, check out the complete installation process.
In this tutorial, we will learn how to install Redis and phpMyAdmin alongside the LEMP stack. Where Redis cache could be used to optimize server performance by reducing database query requests. And then phpMyAdmin will help us to manage databases using the web interface.
So, let’s get started with the installing procedure of LEMP Stack on Ubuntu 18.04, 20.04, 22.04, or Debian 8, 9, 10, 11.
Before we are getting started to install every package one by one, there is one more simple method you can use to deploy a LEMP stack on an Ubuntu server.
The cloud platforms like Digital Ocean, and Vultr provides an app marketplace where with a single click you can deploy preconfigured LEMP stack, and then as soon as possible you can develop your project.
As you can see from the image above, select the LEMP stack and then select server location and size, and then click on deploy. You can start with the small server (1 GB RAM, 25GB Storage) for just in $5 a month. And the best thing is that you don’t have to spend any money for the first month, you will get $100 of free credit to test out the platform.
Prerequisites
- Debian/Ubuntu Linux system
- Root Privileges
Installing Nginx on Ubuntu 22.04
Nginx is a web server that is also used as a reverse proxy and load balancer. For detailed installation information visit the dedicated Nginx page.
Installing Nginx (pronounced engine X) on Ubuntu 22.04 or older version system is very easy. You must follow the step-by-step methods, which are mentioned below.
Step – 1. Update System
Update the system using the following command:
sudo apt updateStep – 2. Install Nginx
After updating the Linux system, use the following apt command to install Nginx on Ubuntu.
sudo apt install nginxWhen you execute the command, the system will ask for your confirmation, whether you want to install it now or want to cancel it. To install now, type Y and then press ENTER on the keyboard.
Step – 3. Check Nginx Service Status
After successfully installing the Nginx web server, we must check its status. So, execute the following command to check:
sudo systemctl status nginxor
sudo service nginx status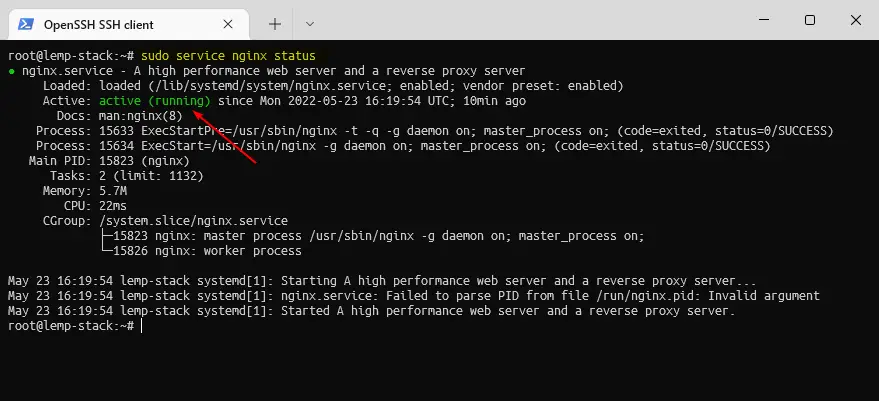
Using the following command, if the Nginx status shows it is running then you don’t need to do anything. If not then, you must execute the following command:
sudo systemctl enable nginxStep – 4. Allow UFW Firewall for Port 80 and 443
Uncomplicated Firewall (UFW) is a program for managing Netfilter firewalls. UFW firewall comes preinstalled with Ubuntu server and some cloud provider blocks port 80 and 443 for public access.
So, using the following command you must add firewall rules for ports 80 and 443 to public access.
sudo ufw allow 80sudo ufw allow 443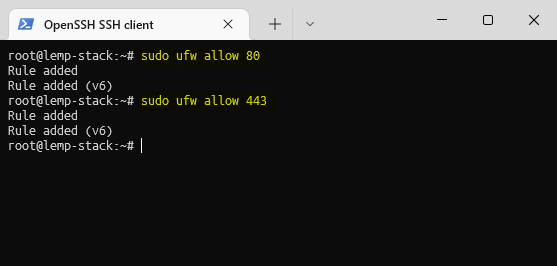
Some cloud providers use the Iptables program to manage the Netfilter firewall rules on the system.
Step – 5. Open IP Address on Browser
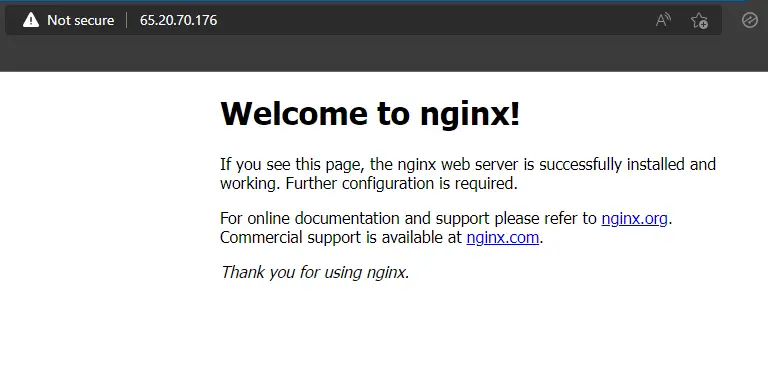
Now check whether the webserver is publicly accessible or not. Use a web browser and type your server’s public IP address/Domain name.
Installing MariaDB Server on Ubuntu 22.04
MariaDB is one of the popular relational database management systems. It is forked from MySQL and maintained by the open-source community.
In this article, we are going to see, how you can install the MariaDB database on the Ubuntu 22.04 server.
Step – 1. Install MariaDB
To install MariaDB on the latest Ubuntu 22.04, you must execute the following command:
sudo apt install mariadb-serverThe system will ask you whether you want to install it or not, as every package does. You must type Y and then press ENTER on the keyboard.
Step – 2. Secure MariaDB
After installing the database you must secure it using password protection and disabling remote access. So, use the following command to secure the database:
sudo mysql_secure_installation- Enter current password for root (enter for none): Enter
- Set a root password? [Y/n] Y
- Remove anonymous users? [Y/n] Y
- Disallow root login remotely? [Y/n] Y
- Remove the test database and access to it? [Y/n] Y
- Reload privilege tables now? [Y/n] Y
You must type Y for every question after entering the root password for the database.
Step – 3. MariaDB Service Status
Use the following command to check the MariaDB database service status. If the output shows that MariaDB is running that means everything is okay.
sudo systemctl status mysql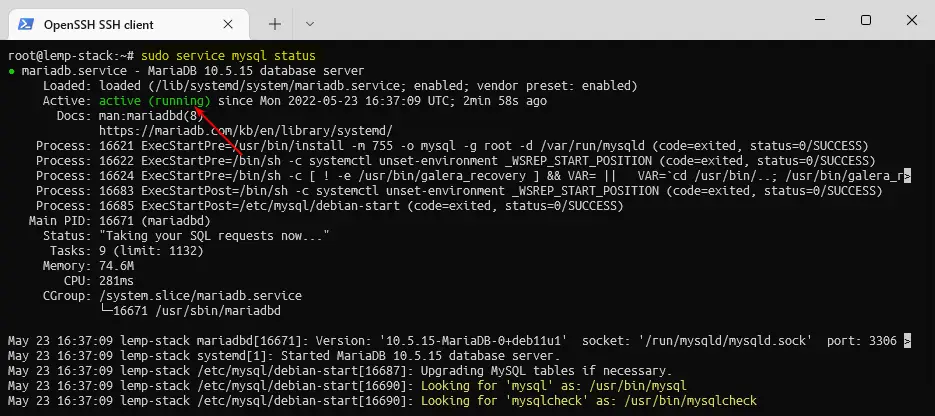
Step – 4. Login & Create Databases
Using the following command you can log in to MariaDB/MySQL command-line interface. You must also enter the root password which was earlier created when we secured the database in step two.
sudo mysql -u root -pCreate a new database:
CREATE DATABASE wordpress;Create a new user:
CREATE USER wp_user@localhost;Set password for the new user:
SET PASSWORD FOR wp_user@localhost= PASSWORD("password");Grant all privileges to the newly created database:
GRANT ALL PRIVILEGES ON wordpress.* TO wp_user@localhost IDENTIFIED BY 'password';Flush older privileges:
FLUSH PRIVILEGES;Check databases list:
SHOW DATABASES;Output:
MariaDB [(none)]> SHOW DATABASES;
+--------------------+
| Database |
+--------------------+
| information_schema |
| mysql |
| performance_schema |
| phpmyadmin |
| sys |
| wordpress |
+--------------------+
6 rows in set (0.002 sec)
MariaDB [(none)]>Exit from MySQL CLI:
Exit;Installing PHP on Ubuntu 22.04
PHP is a general-purpose scripting language, mostly used for web development. PHP is also an integral part of the LAMP and LEMP stack. And you can install the latest PHP on the Linux system using the following steps:
Step – 1. Add PHP/Ondrej Dependency (Optional)
sudo apt install lsb-release ca-certificates apt-transport-https software-properties-common -ysudo add-apt-repository ppa:ondrej/phpsudo apt updateStep – 2. Install Latest PHP
Using the following command you can install the latest PHP 8.1 on Ubuntu 22.04 server. However, if you want to install a specific version of PHP, suppose PHP 7.4, then you must replace the command sudo apt install php-cli with sudo apt install php7.4-cli.
sudo apt install php-cliStep – 3. Install Necessary PHP Modules
The PHP has more than 150 extensions/modules for various work. If you need any specific modules then you can install them. However, some necessary modules will be required for web development or installing a CMS like WordPress.
sudo apt install php8.1-{imagick,bz2,curl,intl,mysql,readline,xml,fpm,mbstring,zip,bcmath}Step – 4. Check PHP-FPM Status
PHP FastCGI process manager or PHP-FPM is a gateway interface which is work between the web server and the dynamic content serving programs. It also improves the web server’s overall performance. So, first, we need to check whether it is running or not.
sudo systemctl status php8.1-fpm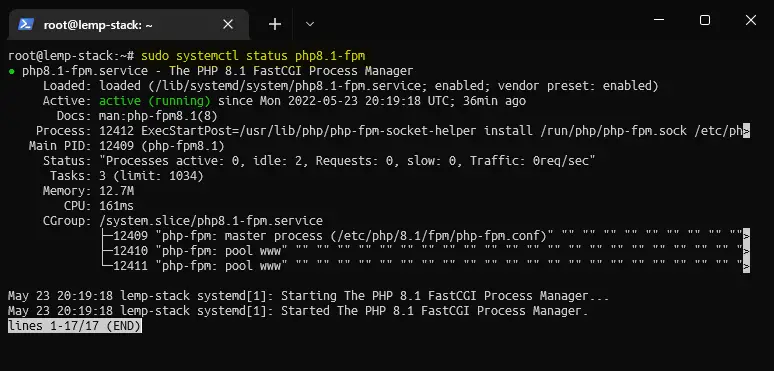
Step – 5. Configure PHP-FPM with Nginx
To configure PHP and the FPM, you must edit the nginx server block (virtual host). When you install the Nginx web server it automatically creates a default server block. So, as an example, we used the default Nginx server block to configure PHP.
You must uncomment some lines (as the highlighted lines) by removing the hash (#) symbol as shown in the image and also need to add index.php cause we are using PHP.
sudo nano /etc/nginx/sites-available/default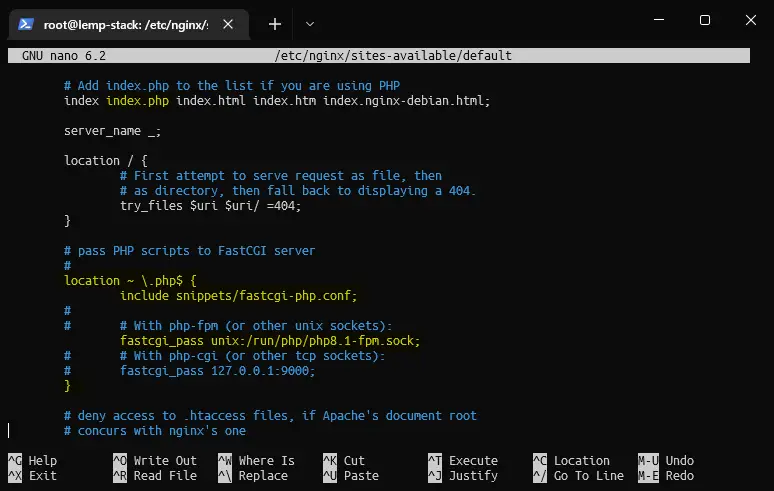
Installing Redis on Ubuntu 22.04
Redis is an open-source object caching program. It is used for real-time data storing, caching, streaming, and messaging. Using the LEMP stack, you can create various web projects. But to improve the performance or speed of the projects you can use Redis object caching.
Some managed web hosting providers charges lots of money for this, and you can install Redis object caching on your server by following the simple steps.
Must Read: - How to Configure Redis Cache for WordPress?
Step – 1. Install Redis Server
sudo apt install redis-serverStep – 2. Install Redis PHP Extension
sudo apt install php-redisStep – 3. Configure Redis
Edit redis.conf file:
sudo nano /etc/redis/redis.confAdd these lines end of the file:
maxmemory 256mb
maxmemory-policy allkeys-lru
Step – 4. Check Redis Status
sudo systemctl status redis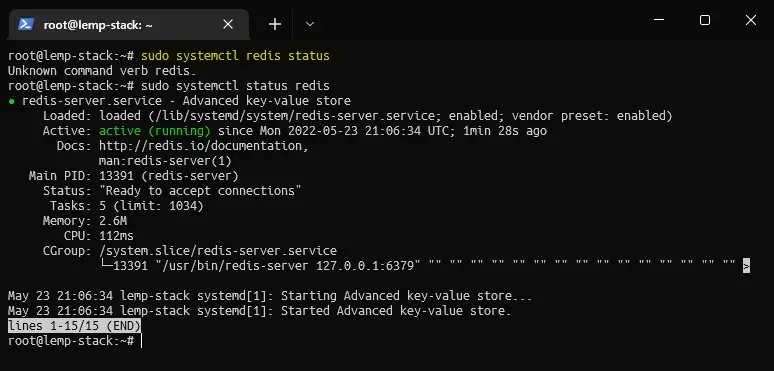
Installing phpMyAdmin on Ubuntu 22.04
phpMyAdmin is an open-source administration tool for MySQL and MariaDB. It has a web interface and using that you can visually manage databases. However, phpMyAdmin is not necessarily required for the LEMP stack. If you can manage databases with the CLI then no need to install this.
Step – 1. Install phpMyAdmin
sudo apt install phpmyadminStep – 2. Choose webserver
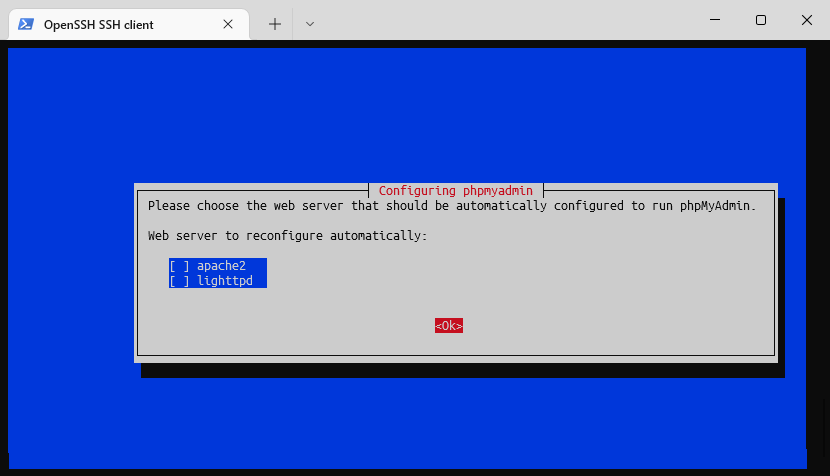
During the installation of phpMyAdmin, it will ask you to choose the web server between Apache and LiteSpeed. However, in the LEMP stack, we are using neither of them. So, press the TAB key and then hit ENTER on the keyboard.
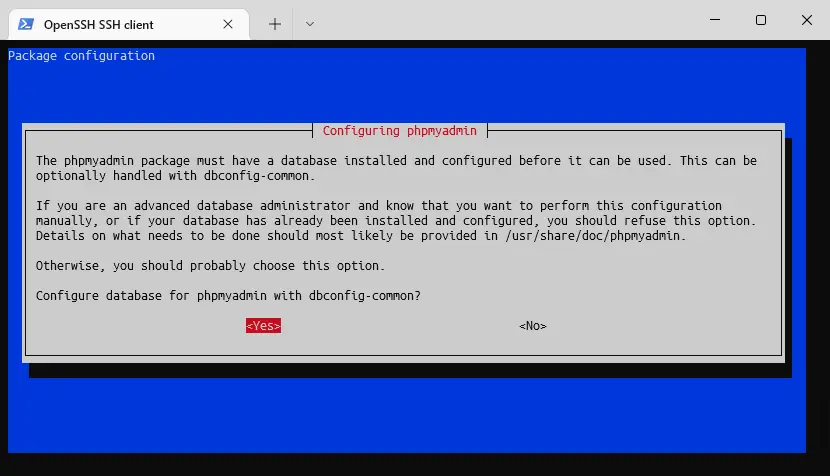
Step – 3. Configure phpMyAdmin Database
During the installation, phpMyAdmin also asks you, do you want to configure phpMyAdmin with dbconfig-common (automated process)? If yes then you need to hit ENTER or switch between Yes or No by pressing the TAB key on the keyboard.
You can also configure phpMyAdmin manually by creating a database using CLI, and inserting the credentials in the config-db.php file.
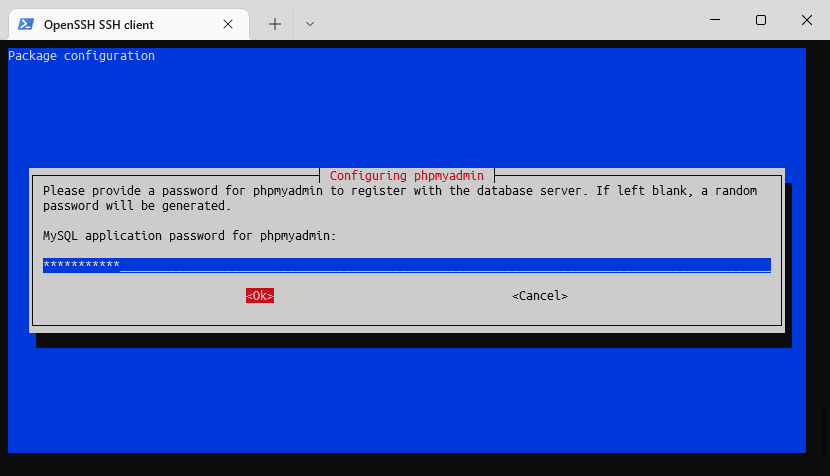
Enter MySQL/MariaDB Root Password:
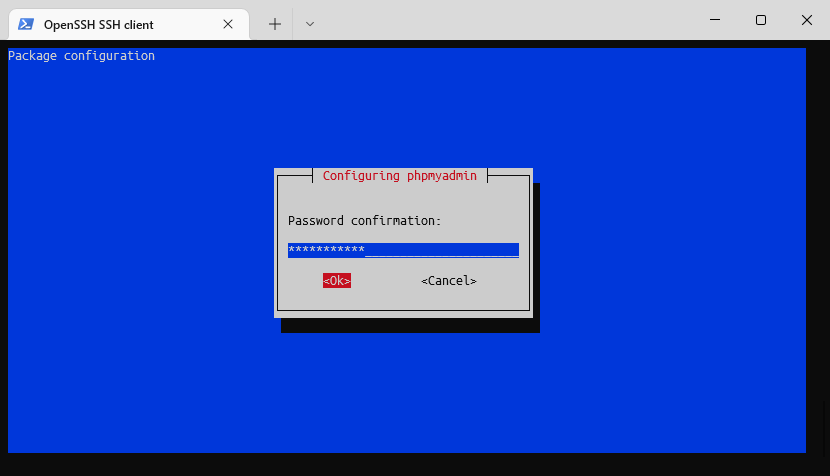
Re-enter MySQL/MariaDB Root Password:
Step – 4. Create a Symbolic link and Give Proper Permission
When we install the phpMyAdmin tool, its origin directory is different from the publicly accessible www directory. So, first, we need to add a symbolic link between these directories and then need to give proper read and write access.
Symbolic link between phpMyAdmin package directory and var/www/html/phpmyadmin:
sudo ln -s /usr/share/phpmyadmin /var/www/html/phpmyadminGive Proper Read, Write & User Group Permission:
sudo chmod 775 -R /usr/share/phpmyadmin/sudo chown root:www-data -R /usr/share/phpmyadmin/The phpMyAdmin installation is completed, now you can check by visiting the public IP address.
Step – 5. Login to phpMyAdmin
http://ip_address/phpmyadmin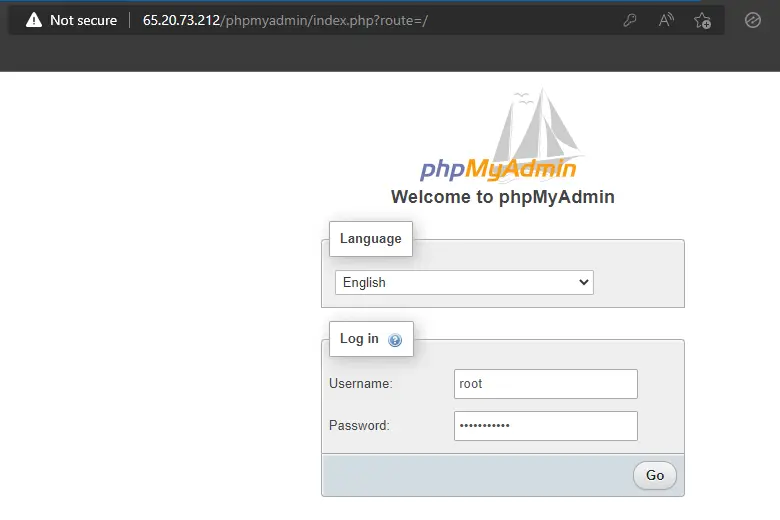
Now, you can log in to phpMyAdmin using your MySQL/MariaDB root password as you can see in the image.
FAQs
What is the LEMP Stack?
LEMP stack is a group open-source of software packages that include Linux, Nginx, MySQL/MariaDB, and PHP.
What are LAMP and LEMP Stack?
The LAMP and LEMP stacks are primarily used to develop web projects.
What is the LEMP Stack Full Form?
LEMP Stack’s full form is Linux, Nginx, MySQL, and PHP.
What is the difference between LAMP and LEMP?
Both are similar except for the web servers, in the LAMP stack A stands for Apache web server, and in the LEMP stack E stands for Nginx (Engine X).
What is LNMP Stack?
LNMP Stack is also known as LEMP Stack. It is a group of programs, primarily used for Web development. LNMP stack stands for Linux, Nginx, MariaDB/MySQL, and PHP.
Summary
In this tutorial, we have presented the installation of the LEMP stack with the Redis and phpMyAdmin database management tool on Ubuntu 22.04. We hope that you have understood everything from this tutorial.
If you face any problems during the installation, do not forget to comment below to discuss your problem and we will try to help you out in solving it.