OpenLiteSpeed is one of the fastest web servers for WordPress and it is an open-source application like Apache. In this article, I will walk you through, that how you can install phpMyAdmin for OpenLiteSpeed. However, phpMyAdmin is not necessarily required for OpenLiteSpeed, but it will improve database management and productivity.
Must Read:- How to Install OpenLiteSpeed web server on Ubuntu?
Step#1
Download the Latest phpMyAdmin Package
To download the latest phpMyAdmin package, visit the official website of their, and follow the instructions mentioned below.
As we are going to install it on our cloud server, so no need to download the package on our local computer.
Download phpMyAdmin Package:
sudo wget https://files.phpmyadmin.net/phpMyAdmin/5.2.0/phpMyAdmin-5.2.0-all-languages.zipNote:- While publishing this article, the latest version of phpMyAdmin was 5.2.0 as highlighted in commands. If you want to install the latest (we recommend) version of phpMyAdmin then please visit the official site and copy the download link from there.
Unzip the Downloaded Package:
sudo unzip phpMyAdmin-5.2.0-all-languages.zipNote: - To unzip the file, your system must have installed the zip extractor installed. If not then, using the following command $ sudo apt install zip you can install the extractor.
Move the Extracted File:
sudo mv phpMyAdmin-5.2.0-all-languages /usr/local/lsws/Example/html/phpmyadminAfter extracting the package, move the phpMyAdmin files to the web server’s root directory. However, you can put the files in any directory and then create a symbolic link between the web server’s root directory and to phpMyAdmin directory.
But without causing any complications, we need to move the files to the root directory as mentioned in the command above.

Do You Need Affordable & Clutter-free Cloud Hosting?
Vultr cloud is one of the best cloud hosting platforms for bloggers, developers, and businesses. Their pricing starts from $2.5 per month, claim $100 free credit for Vultr Cloud.
Edit phpMyAdmin Config File
We need to add Blowfish secret encryption key on the config.inc.php file. However, you will find the config.sample.inc.php file in the phpMyAdmin directory, and we need to rename it. For that execute the following command to copy and rename the file.
sudo cp /usr/local/lsws/Example/html/phpmyadmin/config.sample.inc.php /usr/local/lsws/Example/html/phpmyadmin/config.inc.phpNow execute the following command to edit the config file and add the blowfish secret:
sudo nano /usr/local/lsws/Example/html/phpmyadmin/config.inc.php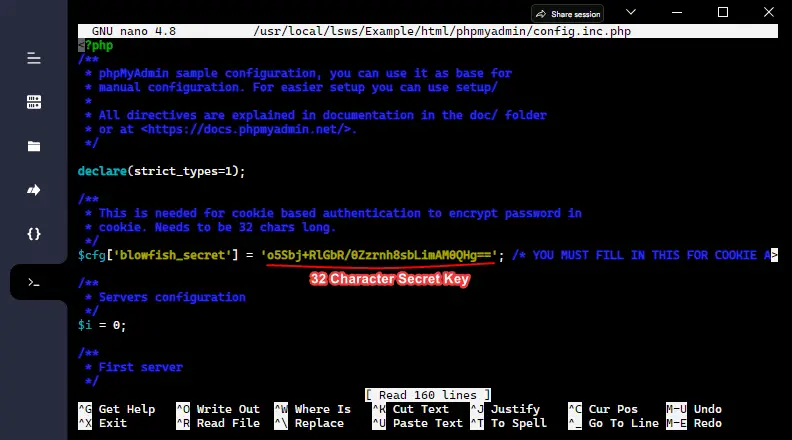
As shown in the image, find a $cfg['blowfish_secret'] = ''; line and add the secret key between the inverted comma.
To generate a random 32-character secret key, use the following command in a separate terminal and paste the generated key.
openssl rand -base64 22 After adding the line, save the config file using the key combination on the keyboard, press CTRL + X, and then type Y and press enter key.
Must Read:- How to Install WordPress on OpenLiteSpeed?
Step#3
Setup Virtual Host for phpMyAdmin
Login to the LiteSpeed web admin console, navigate the Virtual Host menu then select the “Example” virtual host from the list.

When you click on the magnifying glass to edit the virtual host configuration, you will see various horizontal tabs including ‘Context‘, so click on it to add a new context for phpMyAdmin on the LiteSpeed server.
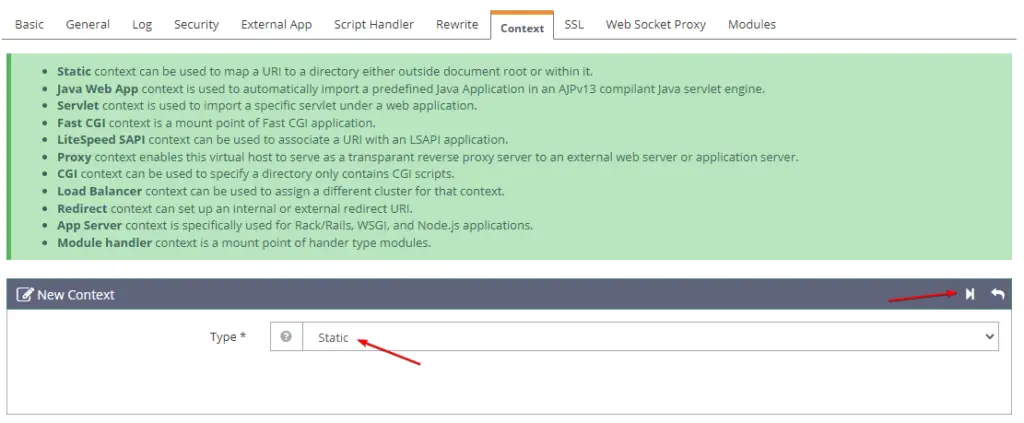
While adding a new context on LiteSpeed virtual host, it will prompt you to select the type of context, so select static as shown in the image. Cause we just need to map the URI or phpMyAdmin on the LiteSpeed web server.
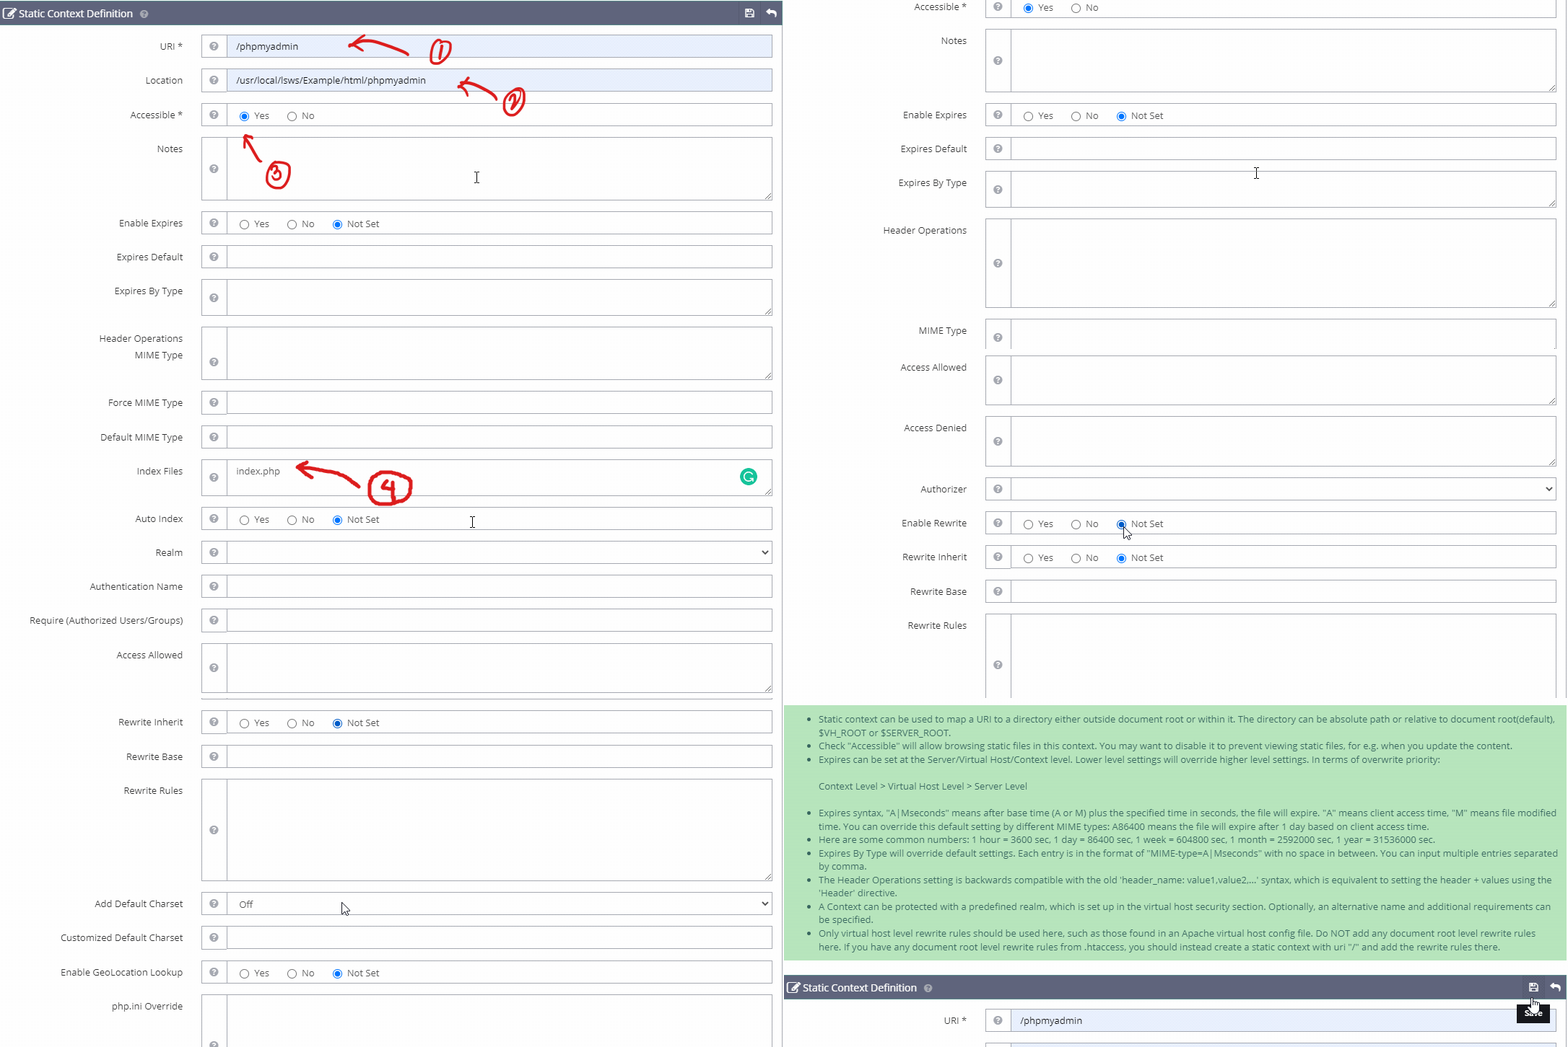
- URI:
/phpmyadmin - Location:
/usr/local/lsws/Example/html/phpmyadmin - Accessible: Yes
- Index Files: index.php
After selecting the type of context, we have to add some important information as shown in the image and the list above. As we have installed the phpMyAdmin in the “Example/html” web root directory of the LiteSpeed server. So, to configure the new context for phpMyAdmin we need to mention the full path of that.
Step#4
Log in to phpMyAdmin
After, adding the context in the virtual host, try to log in phpMyAdmin. Open a new browser tab and put your server’s public IP address with the port number 8088/phpmyadmin, and the URL should look like this http://server_public_ip:8088/phpmyadmin.
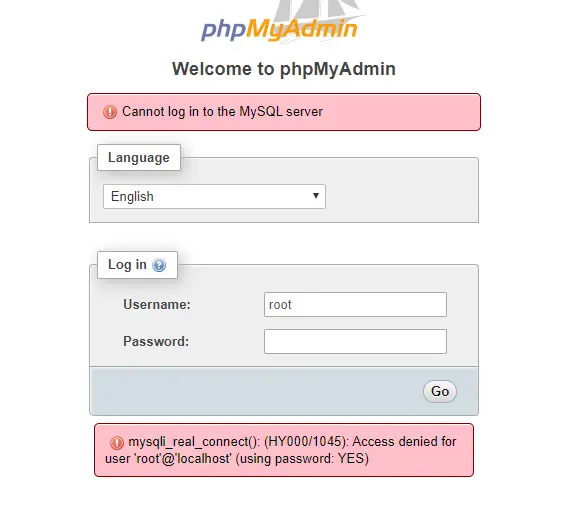
If you try to log in with the root, phpMyAdmin may show the access denied error. Cause the phpMyAdmin configuration. First, you have to give full privileges to the root@localhost user on the MySQL database.
To fix this error, you have to connect the system with SSH, and then log in to the MySQL server as per the following steps.
Login to MySQL:
sudo mysql -u root -pWhen you execute the command system will prompt you to enter your MySQL root password. You must know the root password as you have installed MySQL/MariaDB and secured it with the command line.
If you forgot the MySQL root password, then check out the article to reset the MySQL root password.
Give full privileges to the root user upon phpmyadmin:
GRANT ALL PRIVILEGES ON phpmyadmin.* TO root@localhost IDENTIFIED BY 'root_password';After login into MySQL, you have to execute the following command to give full privileges to the root user. As you can see the password on the command you have to put in your MySQL password.
FLUSH PRIVILEGES;exit;Now flush the privileges and then execute the exit command to quit the MySQL command line, now try to log in again to the phpMyAdmin, using root credentials.
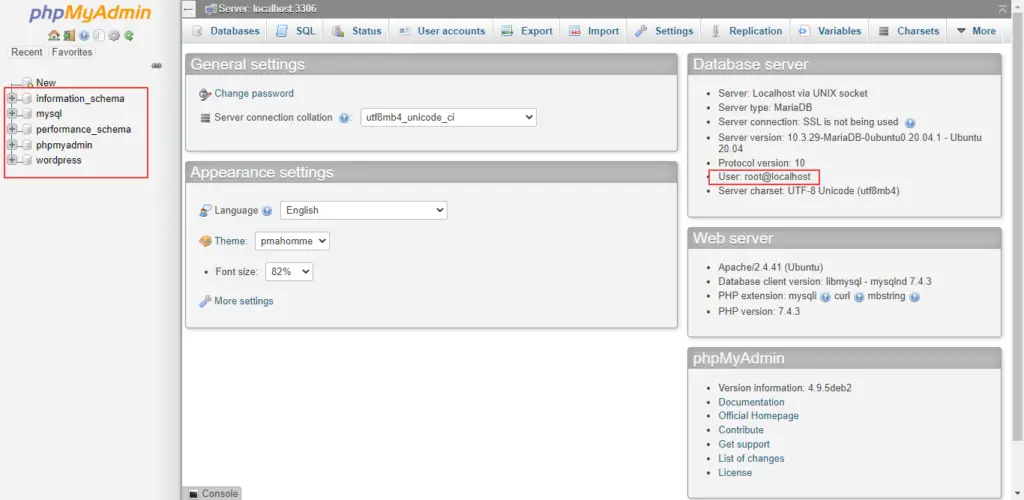
Now, the phpMyAdmin is successfully configured, you can log in with your root username and password. And as you can see in the image above of the phpMyAdmin dashboard, you will have access to all databases, and you can create new databases.
You can go one step further to secure phpMyAdmin from public access. In a virtual host, when you add context you’ll also get the “Realm” option there you can choose “SampleProtectedArea”, which means whoever has the authorization can access it. Without an authorized password, no one can access the page or URI path.
Conclusion
Using this article as your reference you can install phpMyAdmin for OpenLiteSpeed/LiteSpeed web server. Step by step explained, where from you can download the phpMyAdmin zip file, how you can extract it and where have to move it, and finally how to configure the Virtual Host on the LiteSpeed web server.
There is one more method to install phpMyAdmin for OpenLiteSpeed and other web servers. It is simple like installing a program on a computer. For that check out our article, on how to install phpMyAdmin on the Ubuntu system.
You can check out other articles related to OpenLiteSpeed/LiteSpeed like how to add a subdomain and install WordPress. In case have any issues, while installing or configuring phpMyAdmin on your OpenLiteSpeed or LiteSpeed web server, then please don’t forget to comment.