In this tutorial, we will learn how you can install WordPress on Alibaba Cloud Server. When you install a preconfigured WordPress instance, you get outdated software, which is dangerous for the security of WordPress.
So let’s start. Keep in mind that you should already have an active Alibaba Cloud account. If not, then you can read this article to know how to get one year of hosting on Alibaba Cloud for free.
Replacing Alibaba ECS Instance System Operating System
You know that it is best always to use the latest version of the software. All security patches are updated in the new version to use the updated version for a longer-term.
When we take a free trial of Alibaba Cloud, Alibaba offers an opportunity to select an instance. But unfortunately, all cloud instances in those lists are outdated and difficult to update.
That is why we will change the system image of Alibaba Cloud’s ECS instance.
STEP – 1. Stop ECS Instance

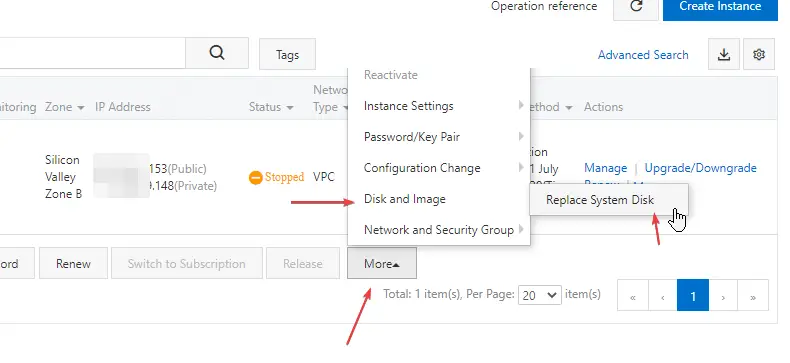
Changing instances OS in the Alibaba cloud is simple, and there is no need to delete the existing VPS, like others. First of all, you have to log in to your dashboard and find the VPS you want to change the OS like shown in the picture. You have to stop the server and then click on more to replace the system disk and image.
STEP – 2. Click More To Replace System Disk

As I have mentioned in the first step, you have to stop the server and then click on the “More” button to replace the system disk. As you can see in the picture above, follow those instructions.

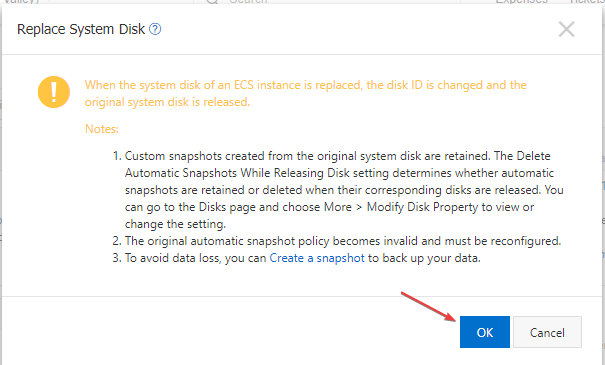
When you click on “Replace System Disk”, Alibaba will prompt you a warning to create a snapshot (system backup). You must ignore and click on “OK” to proceed to system image replacement.
STEP – 3. Select Public Image To Replace System Disk

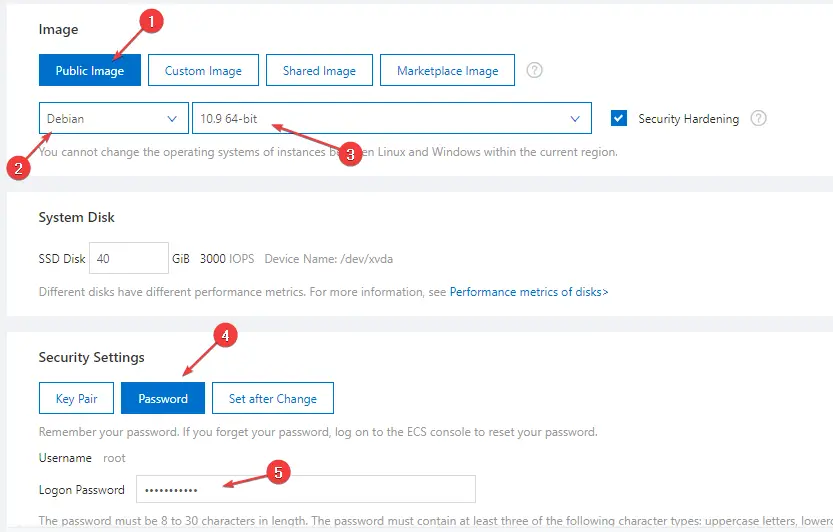
When you click on replace system disk, there will be a new page. There you have to select “Public Image”, then the latest version of the Operating System.
We will install WordPress on our server, so we are going to select Debian 10. Well, Debian and Ubuntu is the most popular Linux distros and well documented on the internet.
After selecting the OS image, we have to set the system password, and there will be other options to secure the system like SSH keys and others. So, select the password option and enter your password.
STEP – 4. Complete The Order

Now, scroll down and accept the terms and conditions and click on the “Create Order” button to complete the process of system disk image replacement.
Install WordPress On Alibaba Cloud [Debian 10] – 10 Steps
After changing the system image on Alibaba Cloud, you will have to connect to the SSH CLI of VPC. For this, you can use Linux and Mac terminals or tools like Windows PowerShell and Putty.
To install WordPress in Alibaba Cloud, first, it is necessary to establish the LAMP stack in the system. If you do not know what LAMP is and how to install it, that article will explain the installation of the LAMP stack in Debian 10 and Ubuntu (Latest Version).
STEP – 1. Connect To The System
Use the following command to connect your Alibaba cloud server. You have to replace the IP Address (000.00.000.00) with your server’s public IP. If you are using Linux or Mac-based computer then, open the terminal and run the command.
For Windows, PC users can use Windows PowerShell or Putty. When you run the command the system will ask you to enter the password.
ssh -i ~/.ssh/ root@000.00.000.00Output:
PS C:\Users\super> ssh -i ~/.ssh/ [email protected]
Load key "C:\\Users\\super/.ssh/": Operation not permitted
[email protected]'s password:
Linux iZt4n2xysgdfdset0j30gZ 4.19.0-12-amd64 #1 SMP Debian 4.19.152-1 (2020-10-18) x86_64
Welcome to Alibaba Cloud Elastic Compute Service!
Last login: Thu Apr 15 19:33:11 2021 from 1.38.52.152
root@iZt4n2xysgdfdset0j30gZ:~#
STEP – 2. Create Database
I have already mentioned that you have to install the LAMP stack on your server to install a WordPress website. The LAMP stands for Linux, Apache Server, MySQL Database, and PHP, so if you haven’t installed the stack, please check out the tutorial about How to Install LAMP stack on Debian and Ubuntu OS.
Must read:- How to Install or Upgrade to PHP 8.x
After completing the installation of the LAMP stack, run the following command for creating a database for the WordPress website. When you execute the command server will prompt you to enter your root password of MySQL.
sudo mysql -u root -pNow execute the following command to create a database for WordPress. As you can see in the command below, I have put the name wordpress as an example, and you can put whatever you want.
CREATE DATABASE wordpress;After creating a database, we have to create a user. So, for the example, I have used wordpress_user. You can see the command below, and I will suggest you keep a strong name instead of using this example.
CREATE USER wordpress_user@localhost;Now, we have to set the password for the database. It is essential, and you should use a strong password combined with the alphabet, symbols and numbers. For example, I have used it, and you have to put your password here and replace the username.
SET PASSWORD FOR wordpress_user@localhost= PASSWORD("wordpress_password");After setting the password, we have to give all privileges to the user of the database. So, use the following command, and before executing the command, replace the database name, user, and password as your own.
GRANT ALL PRIVILEGES ON wordpress.* TO wordpress_user@localhost IDENTIFIED BY 'wordpress_password';Now, use the following command for flushing privileges.
FLUSH PRIVILEGES;Before exiting the MySQL CLI, you have to make sure if the database creation is a success or not, so use the following command to list your existing databases.
SHOW DATABASES;Output:
MariaDB [(none)]> SHOW DATABASES;

+--------------------+
| Database           |
+--------------------+
| wordpress          |
| information_schema |
| mysql              |
| performance_schema |
| redmirom           |
+--------------------+

5 rows in set (0.003 sec)
If you can see the databases you have created now, it is showing in the list, and then you can close the MySQL CLI using the following command.
exit;STEP – 3. Creating WordPress Root Directory
In this step, we have to create a root directory for the WordPress website. So, use the following command for changing the directory location.
cd /var/www/htmlAfter changing the directory use the following command to create a new directory for the WordPress website.
sudo mkdir wordpressSTEP – 4. Download WordPress Source File
In this step, you have to change the directory to the cloud server’s root directory using the following command.
cdNow execute the following command to download the latest version of the WordPress source file.
wget -c https://wordpress.org/latest.tar.gzSTEP – 5. Extract WordPress Source Files
In the fifth step, we have to extract the compressed WordPress source files. So, use the following command as mentioned below.
tar -xvzf latest.tar.gzSTEP – 6. Copy the extracted WordPress file
Now, copy the extracted WordPress source files to the root directory of WordPress. So use the following command to proceed.
sudo rsync -avP ~/wordpress/ /var/www/html/wordpressSTEP – 7. Give Directory Ownership to the Apache
In this step, we have to give ownership of the WordPress root directory to the Apache webserver. So, use both commands as mentioned below.
sudo chown -R www-data:www-data /var/www/html/wordpress/sudo chmod 755 -R /var/www/html/wordpress/STEP – 8. Create Apache Virtual Hosts
Now, we have to create a virtual hosts file. Virtual hosts refer to using more than one website on a single server. Check the Apache documentation.
So, use the following command to create a new virtual hosts file.
sudo nano /etc/apache2/sites-available/wordpress.confAs you can see in the following lines of code, we have to paste that into the terminal. In virtual hosts, you have to mention your domain name. For example, I have used example.com.
<VirtualHost *:80>
    ServerAdmin admin@example.com
      DocumentRoot /var/www/html/wordpress
    ServerName example.com
    ServerAlias www.example.com
     <Directory /var/www/html/wordpress>
          Options FollowSymlinks
          AllowOverride All
          Require all granted
    </Directory>
     ErrorLog ${APACHE_LOG_DIR}/example.com_error.log
    CustomLog ${APACHE_LOG_DIR}/example.com_access.log combined
</VirtualHost>
STEP – 9. Rewrite Apache modules
Now, you have to rewrite apache modules, so use the following three commands.
sudo ln -s /etc/apache2/sites-available/wordpress.conf /etc/apache2/sites-enabled/wordpress.confsudo a2enmod rewritesudo systemctl restart apache2STEP – 10. Open Your Website To Configure WordPress
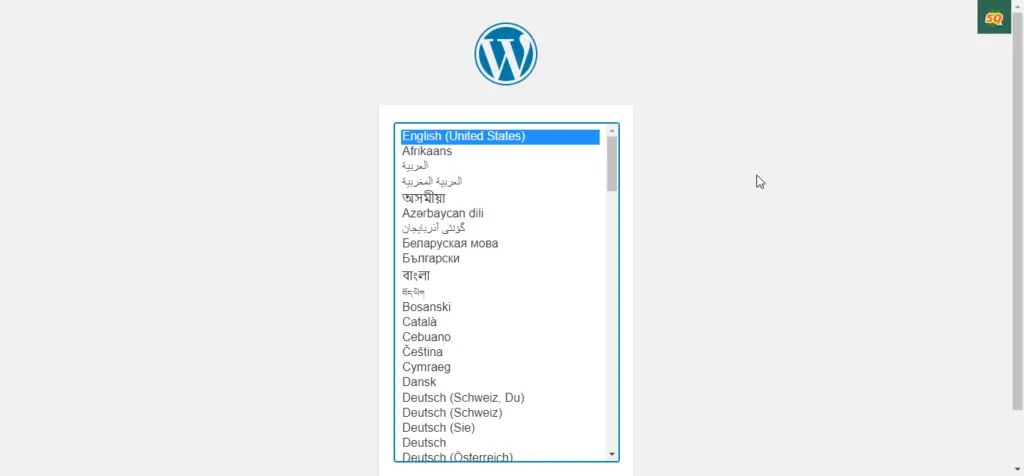
After setting up the apache virtual hosts, we have to open the website on the browser to proceed with the pre-configuration of WordPress. In this step, we have to select language, configure the database with WordPress, and then fill in the website credentials like site name, password, and email address.

Summary
That was the basic process of installing a WordPress website in Alibaba Cloud hosting. Alibaba Cloud gives you many cloud resources for a trial user, including Cloud hosting services and others.
You have to follow up on all the steps I have explained to install WordPress in this tutorial. If you have any issues installing WordPress in your Alibaba cloud server, please don’t forget to comment.