Have you faced speed problems with your website? Taking much time to load content, images, videos, etc.?
If yes, then you should use CDN (Content Delivery Networks), if you have the budget then you can go with paid CDN plans but if not then I highly recommend using free Cloudflare CDN. It will solve your 70+% speed problems with an extra layer of security.
Cloudflare CDN is very easy to configure with WordPress, and Blogger blogs, but you will get better controls if you are using a WordPress blog.
What is Cloudflare CDN?
Cloudflare CDN is like other Content Distribution networks or Content Delivery Networks. Cloudflare is one of the best and most popular companies that provide free and reliable CDN.
They also give the option to choose paid plans, but if you are a beginner, then choose a free plan. This free plan includes Cloudflare’s most robust Content Delivery Network (CDN) and some extra security for your website.
How to Setup Cloudflare CDN?
Free Cloudflare CDN configuration for a website is very simple. You need to follow some basic steps as details are given below.
Sign up Cloudflare
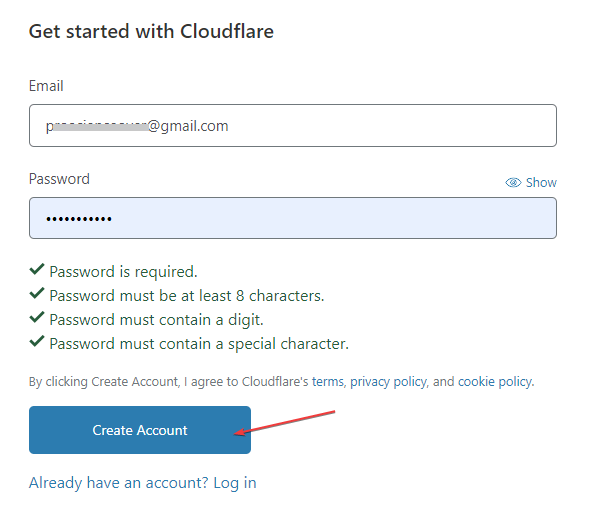
First, you need to sign up Cloudflare website to use free Cloudflare CDN. If you have an account already, click on ‘Sign In’ and log on to the Cloudflare website.
Add Domain Name to Cloudflare
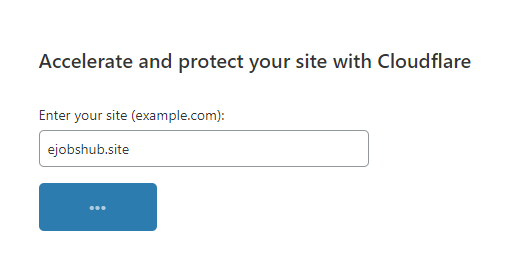
If you signed up for free Cloudflare CDN the first time, then Cloudflare will prompt you to add your domain name (Excluding HTTPS, http, and www, e.g., Example.com).
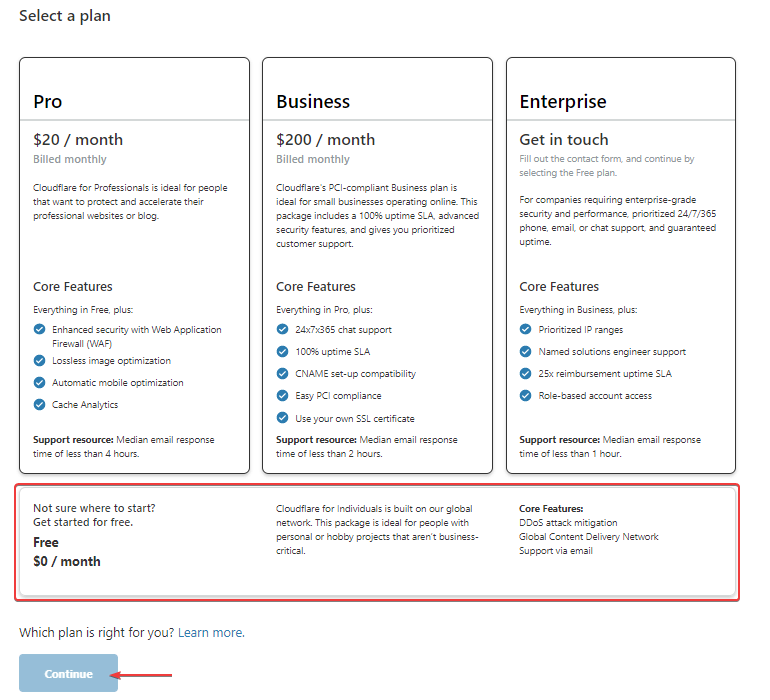
After adding the domain name, you have to select a plan. In my case, I will select the free plan that’s included free Cloudflare CDN and DDoS attack protection.
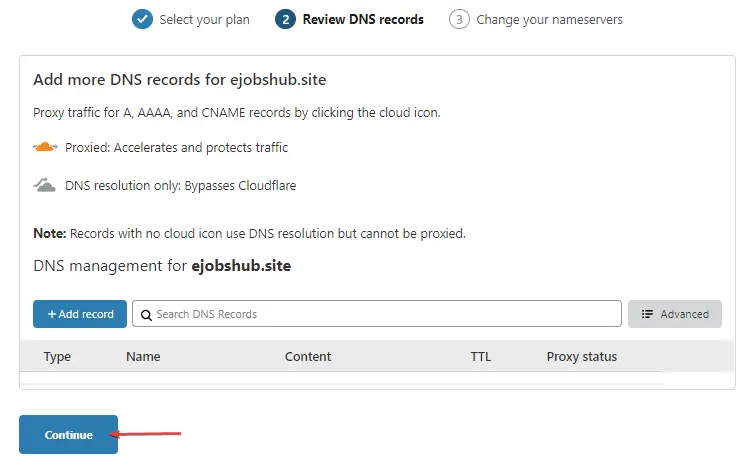
After selecting the plan, Cloudflare will analyze the domain name’s current DNS records. If you pointed your domain name to a web hosting, Cloudflare would automatically show you all your hosting Name Server (NS) records.
Keep in mind that you do not have to do anything in this step and don’t delete any records in the analyzed DNS section.
Replace Existing Name Server with Cloudflare Name Server
In this step, Cloudflare will prompt you to change your Domain’s current name servers to Cloudflare’s name servers.
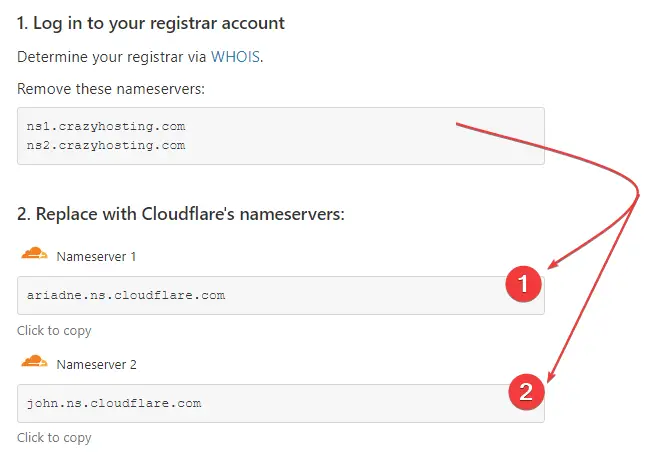
Copy Cloudflare’s unique name servers and open your DNS manager* and replace them with these two Cloudflare name servers.

In case you have four name servers on your DNS manager on your Domain registrar website, don’t worry; you need to delete all name servers and add Cloudflare’s two name servers. Then hit update, or save whatever shows in your DNS manager.
Note – DNS propagation can take up to 24 hours, so keep patience. In most cases, the Cloudflare name server updates instantly, or in about 10 minutes, maximum.
When your domain’s DNS is configured with Cloudflare, then on the Cloudflare Dashboard, you can see a success message as in the image below.

Quick Optimization with Cloudflare
This is Cloudflare’s three steps quick optimization of your website. You need to configure essential things like Always HTTPS, Minification, and SEO redirect in these three steps.
- Improve Security
- Optimize Performance
- Summary
Connect Free Cloudflare CDN to Web hosting
This step is optional and not necessary if your domain is already pointed to web hosting. Because when you changed your domain DNS records to replace the web hosting name server, Cloudflare automatically added the name servers of your web hosting on Cloudflare DNS.
In case you only pointed your domain name to Cloudflare, and now you want to connect a Web hosting with your domain name, then follow these steps.
In Cloudflare DNS, you can connect your hosting via two methods or two types of records. One is NS – name servers, and the second one is A – IP address. You can point your domain name via one of these records.
Using IP Address To Connect Web Hosting To Cloudflare
Connecting web hosting to Cloudflare using IP addresses (A records) is very simple. You need to log in to your Cloudflare Dashboard, click on DNS, log in to your hosting dashboard in a new tab, and then find a public IP address.
If you are using any kind of shared hosting, you will find your IP address on the cPanel dashboard or in the hosting status.
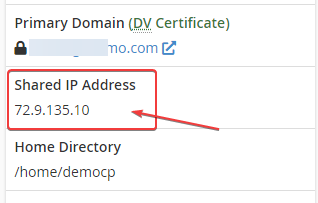
If you use VPS or a dedicated cloud server (hosting), you will find your IP address on the cloud instances page and the network section.

In this tutorial, I have used Liquid Web Nexcess cloud hosting. This hosting is great for WordPress websites. Higher performance with easy scalability. Try Nexcess by Liquid Web for 14 Days Without a Credit or Debit Card.
BTW, for connect your hosting to Cloudflare, you need to copy your Public IP address and return to the Cloudflare DNS tab, click on ‘+ Add record’ now select ‘A’ and put ‘@’ on the host section, then put your IPv4 or IPv6 records on record section.

Now, hit ‘Save’ and refresh the Cloudflare dashboard.
Using Name Servers to Connect Web Hosting To Cloudflare
Connecting web hosting to free Cloudflare CDN using the name servers is as simple as an IP address. When you purchase shared hosting, the hosting provider gives name servers to point your domain name to the host.
Your hosting provider will send you an email with the hosting credentials and the name servers in most cases. You can also get name servers from your hosting provider’s documentation page.
In case you didn’t find your name server’s information, then you should contact your hosting provider.
So, we need to connect the hosting service to Cloudflare, and for that, you need to copy your name servers details and open the Cloudflare dashboard and click on DNS.
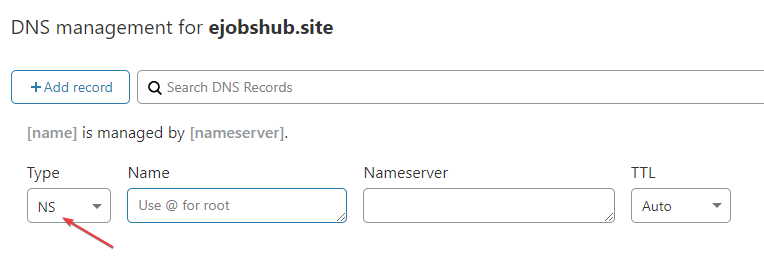
Click on ‘+ Add record’ and select ‘NS’ and insert ‘@’ on the host section and then enter your name server in the ‘Nameserver’ section (e.g., ns1.example.com).
Performance Optimization With Free Cloudflare CDN
Cloudflare automatically configures the best setup according to your website. However, you can make changes to the configuration.
On the Cloudflare dashboard, you will find lots of tweaking features to optimize your website. You can create page rules, set up workers, and many other things.
Some advanced optimization features are only available on paid plans, or you can buy the feature separately.
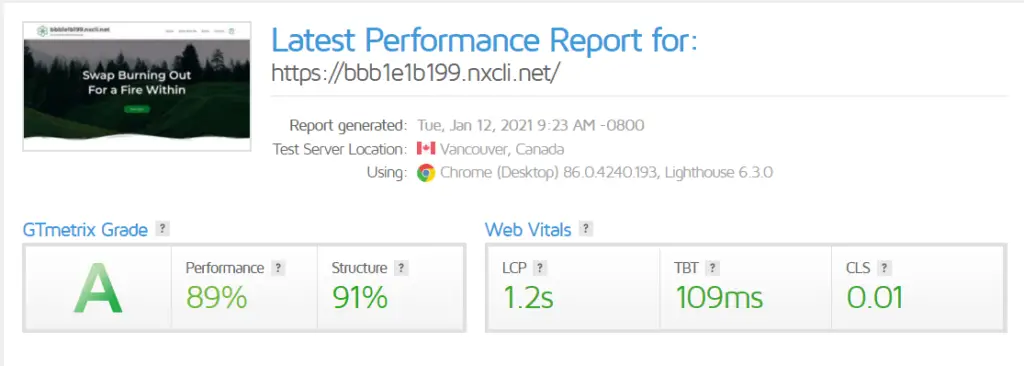
I have tested my newly created website on the GTMetrix speed test tool. I have taken two tests, one is before setup with Cloudflare CDN, and the second one is after setup with Cloudflare CDN.
Test Without Free Cloudflare CDN
Test With Free Cloudflare CDN
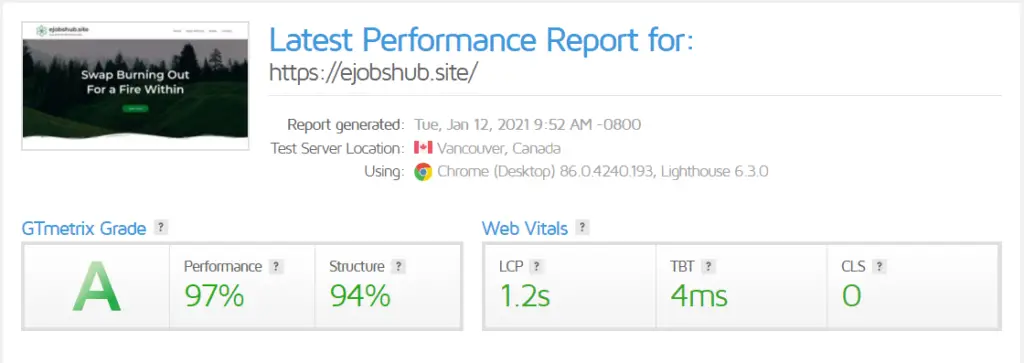
Test results were not very different from each other, but the test results and the CDN section, as you can see. Before the free Cloudflare CDN, there were many statics resources, and those were affecting performance.
But when I configured the hosting with Cloudflare CDN, you can now see the statics recourses reduced up to 90 percent.
FAQs About Free Cloudflare CDN
Is Cloudflare a good CDN?
Cloudflare is a very good CDN in pricing, and you will get CDN and an extra layer of security for your website for free. But if you need more, then you can go with Cloudflare paid plans.
How do I use Cloudflare as a CDN?
For Cloudflare as a CDN, you need to point out your website or domain to Cloudflare name servers. Cloudflare automatically enables the Cloudflare CDN services and other security services like an end to end encryption with SSL certificates and others.
How much does Cloudflare CDN cost?
Cloudflare has four paid plans, including a free plan. Cloudflare PRO plan starts at $20 per month, and the business plan’s cost is $200 per month.
Is Cloudflare bad for SEO?
No, Cloudflare does not affect your website’s SEO. It helps in improving your website performance.
How do I use Cloudflare for free?
Visit Cloudflare’s official website and sign up, then select a $0 per month plan and then configure your website as instructed.
Conclusion
Cloudflare is one of the most popular and convenient free CDN providers. Cloudflare not only provides free CDN but also protect from DDoS attack.
But if you want the best high-performance and high-security CDN provider, then you can go with StackPath’s premium CDN.
My recommendation for beginner bloggers or web developers is to go with free Cloudflare CDN, and if they start revenue generation soon, they should go with premium CDNs.
Cloudflare is also good for managing all of your domain names in one place, no need to open your different- different domain registrar dashboard.
BTW, guys, that’s it for this article. If you have any problems with the free Cloudflare CDN configuration, just leave your thought in the comment section.